


 Top Rated Course

We may not have the course you’re looking for. If you enquire or give us a call on 01344203999 and speak to our training experts, we may still be able to help with your training requirements.
Microsoft Word Borders: Page, Text, and Customisation Guide
The Knowledge Academy 17 August 2026Explore how Microsoft Word Borders can be used effectively to improve document layout, presentation and readability.

Training Outcomes Within Your Budget!
We ensure quality, budget-alignment, and timely delivery by our expert instructors.
Table of Contents
KEY TAKEAWAYS
1. Microsoft Word includes Page, Text, Paragraph and Table Borders for different formatting needs.2. Choose the border type based on what you want to format.3. Customise borders using style, colour, width, sides and shading.4. Use Apply to and document sections to control where Page Borders appear.5. Fix common issues by checking the border type, Preview, width and positioning.
Your Word document is almost ready. But is it really finished?
✓ Content written
✓ Headings formatted
✓ Images positioned
✓ Table added
✓ Visual structure
That final box can make a surprising difference.
Borders can frame, highlight, separate and organise content without changing a single word. Knowing How to Create Borders in Microsoft Word helps you use that structure effectively. This blog shows you how to choose, customise, remove and troubleshoot borders.
What are Microsoft Word Borders?
Microsoft Word Borders are formatting features that add lines around pages, text, paragraphs and tables. Depending on the selected option, borders can appear on all sides or only on the top, bottom, left or right.
Borders can also be combined with shading to emphasise particular content. You can adjust their style, colour, width and placement to create visual hierarchy and make different parts of a document easier to distinguish.

Types of Borders in Microsoft Word
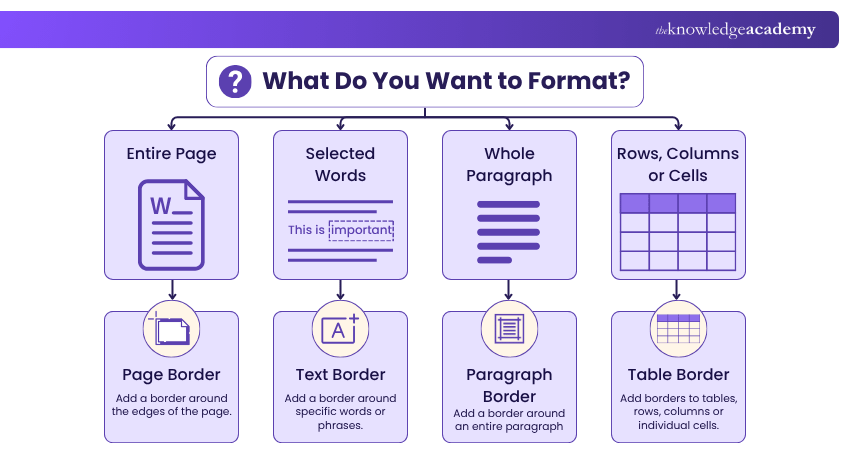
Microsoft Word provides different border options based on what you want to format. Understanding these types can help you select the right option before changing your document.
1) Page Borders
Page Borders frame the edges of a document page. They can be useful for title pages, certificates, invitations and other documents that need a defined visual frame. They can also help create a consistent and polished appearance across a document or selected sections.
2) Text Borders
Text Borders surround selected words or phrases. They are useful when you want to draw attention to a particular piece of information without affecting the whole paragraph. They work well for highlighting labels, key terms or short statements.
3) Paragraph Borders
Paragraph Borders apply to an entire paragraph. They can be added to all sides or selected sides to separate content and create visual structure. They are particularly useful for highlighting notes, warnings or important sections.
4) Table Borders
Table Borders define the edges of a table and its cells. They help separate rows and columns and make tabular information easier to follow. You can adjust individual borders to improve clarity and emphasise specific cells or sections.
How to Create Borders in Microsoft Word?
The method for creating borders depends on whether you want to format a page, text, paragraph or table. Let's look at each one.
1) How to Create a Page Border in Microsoft Word?
Page Borders help frame an entire page and give documents a more defined appearance. Follow these steps to create one:
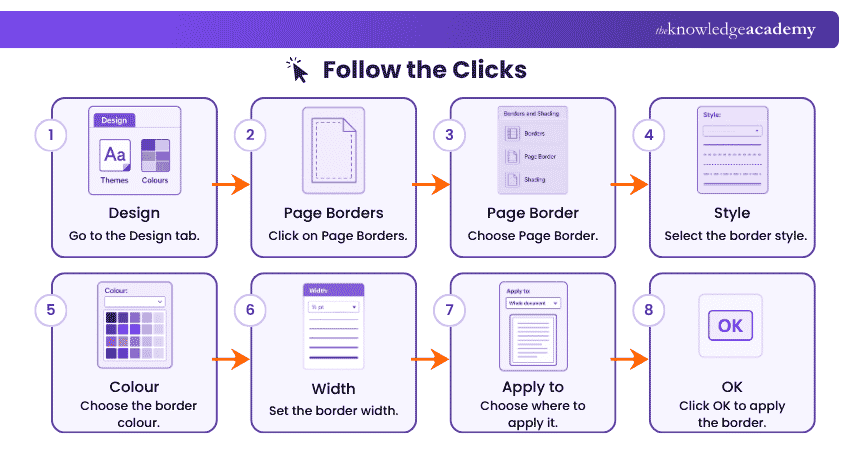
1) Open your Word document.
2) Go to the Design tab.
3) Select Page Borders.
4) Open the Page Border tab in the Borders and Shading dialog box.
5) Choose the required border setting.
6) Select the preferred Style, Colour and Width.
7) Select Options to adjust the distance between the border and the page edge, if needed.
8) Review the border in the Preview area.
9) Use Apply to and choose where the border should appear.
10) Select OK to apply the border.
2) How to Create a Text Border?
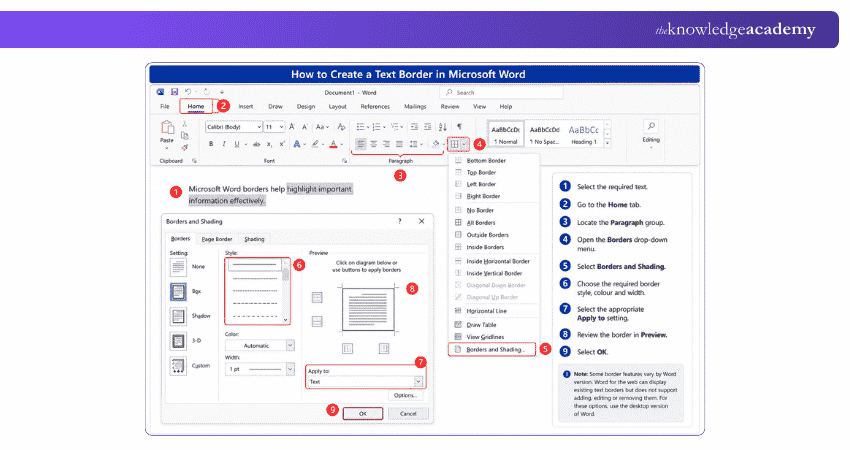
Text Borders are useful when only particular words or phrases need emphasis.
Follow these steps:
1) Select the required text.
2) Go to the Home tab.
3) Locate the Paragraph group.
4) Open the Borders drop-down menu.
5) Select Borders and Shading.
6) Choose the required border style, colour and width.
7) Select the Apply to setting.
8) Review the border in Preview.
9) Select OK.
Note: Some border features vary by Word version. Word for the web can display existing text borders but does not support adding, editing or removing them. For these options, use the desktop version of Word.
3) How to Create a Paragraph Border?
To apply a border to an entire paragraph:
1) Place the cursor inside the paragraph or select the required paragraphs.
2) Go to Home > Paragraph.
3) Open the Borders menu.
4) Select a border option or choose Borders and Shading for additional settings.
5) If using Borders and Shading, adjust the style, colour and width and set Apply to > Paragraph.
6) Select OK to apply the border.
Master Microsoft Office tools for greater workplace productivity and success by registering for Microsoft Office Training now!
4) How to Create Table Borders in Microsoft Word?
Table Borders help define cells, rows and columns.
1) Select the required table or cells.
2) Go to Table Design > Borders.
3) Choose where the borders should appear.
4) Select the required line style, colour and width, if needed.
5) Apply the formatting to the selected cells or table.
Pro Tip: Avoid making every table line unnecessarily heavy. Using border weight strategically can help important information stand out without making the table look crowded.
Try It Yourself: 60-Second Border Challenge
Open a blank Word document and try this:
Add a Page Border.Type one sentence and add a Text Border.Add a border to one Paragraph.Insert a small table and change its Table Borders.
Challenge: Can you use all four border types without returning to the instructions?
How to Customise Borders in Microsoft Word?
Creating the border is only the first step. Microsoft Word provides several options for changing its appearance.
1) Style
Choose an available line style, such as solid, dotted, dashed or double. Different styles can create subtle separation or stronger visual emphasis.
2) Colour
Select a colour that works with the overall document design. Consistent and subtle colours are usually better suited to professional documents. Avoid colours that distract from the content or reduce readability.
3) Width
Adjust the thickness of the border. Thin borders provide subtle separation, while thicker borders create stronger emphasis. Choose a width that keeps the border noticeable without overpowering the content.
4) Border Sides
For page, text and paragraph borders, use the Preview area to control whether the border appears on the top, bottom, left, right or all sides. Selecting individual sides gives you more control over how content is separated.
5) Shading
Combine borders with shading when additional emphasis is needed, such as for notices or important information. Use light shading to highlight content without making the section look too heavy.
6) Try These Border Recipes
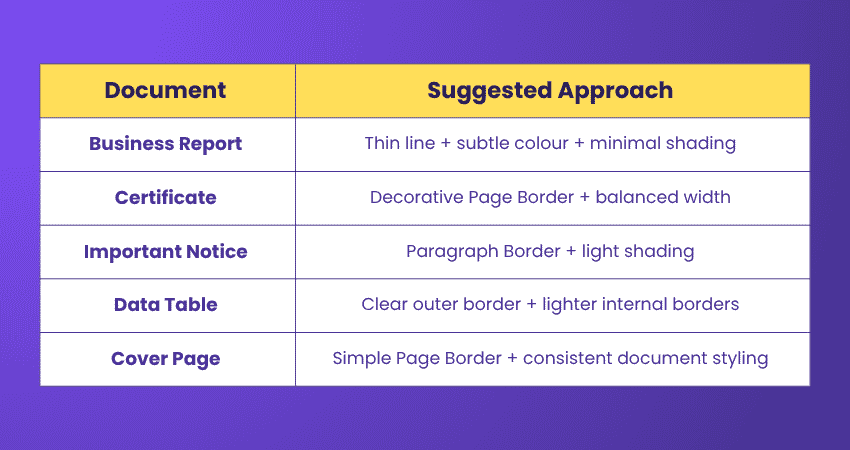
Design Tip: Keep borders consistent with your document's purpose and style. Avoid adding decoration that distracts from the content.
How to Apply Borders to Specific Pages or Sections?
Sometimes, you may want a Page Border on only part of a document. For example, a report may need a border on its cover while the remaining pages use a simpler design.
Page Borders are applied by section. To give a particular page its own border independently of surrounding pages, you may need to place it in a separate section.
To apply a Page Border to a particular section:
1) Create the required section using section breaks where necessary.
2) Place the cursor in the relevant section.
3) Go to Design > Page Borders.
4) Choose the required Page Border settings.
5) Use Apply to and select the appropriate section option.
6) Check the result in Preview.
7) Select OK.
Practical Example: If you want a border only on the cover of a report, separate the cover from the rest of the document where necessary and use the relevant Apply to option rather than manually drawing lines around the page.
How to Remove Borders in Microsoft Word?
Knowing How to Create Borders in Microsoft Word is useful but knowing how to remove unwanted ones is just as important.
1) Remove a Text or Paragraph Border
Select the affected content.
Go to Home > Borders.
Select No Border.
2) Remove a Page Border
Go to Design > Page Borders.
Open the Page Border tab.
Select None.
Check the Apply to setting.
Select OK.
3) Remove Table Borders
To remove borders from a table:
Select the table or specific cells.
Open the Borders options.
Choose No Border to remove the selected borders.
Check the table to ensure only the required borders have been removed.
Quick Check: Before removing a border, identify whether it belongs to text, a paragraph, a page or a table. This can help you choose the correct border controls.
Spot the Border Mistake
Think you know Microsoft Word Borders? Look at the example below and identify three border mistakes before checking the answers.
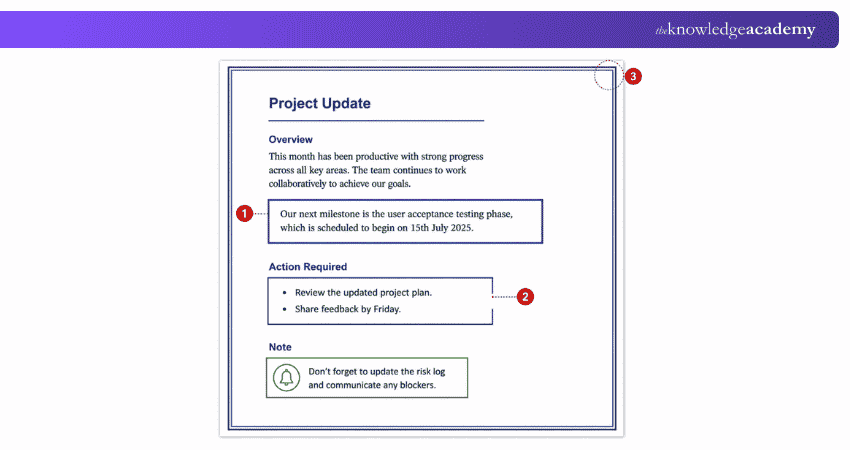
Did You Spot Them?
① Border Too Large? → Check Text vs Paragraph
② Missing a Side? → Check Preview
③ Too Close to the Edge? → Check Page Border positioning
Common Microsoft Word Border Problems and Fixes
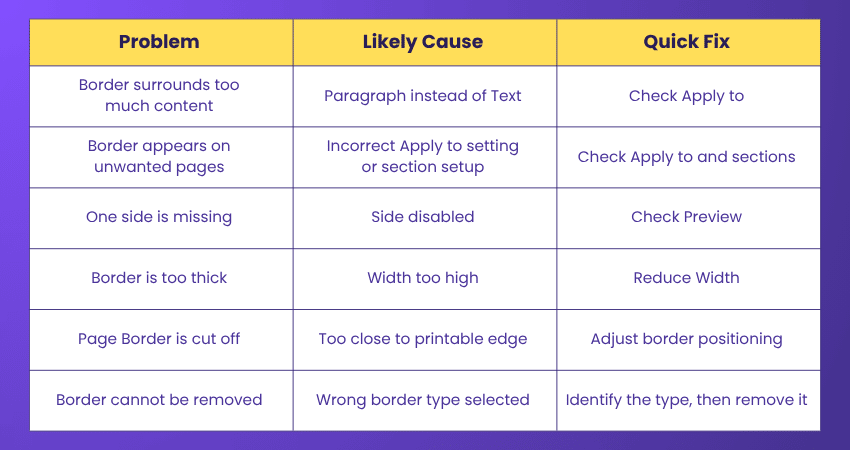
Borders do not always behave as expected. Instead of repeatedly changing settings, identify the symptom first.
Microsoft Word Border Troubleshooter
Find the problem you're seeing and try the corresponding quick fix.
Microsoft Word Border Cheat Sheet
Use this quick guide to find the right border option in Microsoft Word
|
What Do You Want to Do? |
Quick Path |
|
Add a Page Border |
Design → Page Borders |
|
Add a Text Border |
Home → Borders |
|
Add a Paragraph Border |
Home → Borders |
|
Format Table Borders |
Select Table/Cells → Border options |
|
Customise a Border |
Borders and Shading |
|
Remove a Border |
No Border / None |
Conclusion
Learning How to Create Borders in Microsoft Word can help you organise content, highlight key information and improve document presentation. The key is choosing the right border for the right purpose. By customising borders carefully and knowing how to troubleshoot them, you can create clean, structured and professional-looking documents.
Turn ideas into engaging, polished, and visually powerful slides with our Microsoft PowerPoint Training – Register today!
Frequently Asked Questions
Can You Download More Borders for Microsoft Word?

Microsoft Word includes built-in border styles and decorative options. If you want a design that is not included, you can insert an image or graphic and position it as a border. However, it will function as an image rather than as a new built-in Border style.
Can I Add a Border Around an Image in Microsoft Word?
Yes. Select the image, go to Picture Format > Picture Border, then choose the border colour, thickness and line style. This helps separate the image from surrounding content and can give it a more defined appearance.
What is the Difference Between Borders and Shading in Word?
Borders add lines around or alongside content, while shading adds background colour behind text or paragraphs. You can use them separately or together to improve emphasis and visual structure.
Do Microsoft Word Borders Appear When Printed?
Yes. Borders normally appear when the document is printed. However, Page Borders positioned too close to the paper edge may fall outside the printer's printable area. Adjust the Page Border options or margins if part of the border is missing.

The Knowledge Academy


Global Training Provider
The Knowledge Academy is a world-leading provider of professional training courses, offering globally recognised qualifications across a wide range of subjects. With expert trainers, up-to-date course material, and flexible learning options, we aim to empower professionals and organisations to achieve their goals through continuous learning.


 If you wish to make any changes to your course, please


