We may not have the course you’re looking for. If you enquire or give us a call on 01344203999 and speak to our training experts, we may still be able to help with your training requirements.
Training Outcomes Within Your Budget!
We ensure quality, budget-alignment, and timely delivery by our expert instructors.

Microsoft Word is extensively used to write and edit documents. However, imagine you need to register in a different language or check spelling in various languages. For that, you need to know How to Change Language in Microsoft Word.
By understanding and using the language settings in Word, you can seamlessly switch between languages, making your work more efficient and accurate. This blog will teach you how to change a Word document's language. This blog will answer the question “How to Change Language in Microsoft Word?” by .
Table of contents
1) Why change the Language in Microsoft Word?
2) Changing the display language
3) Proofing language settings
4) User interface language
5) Multilingual editing
6) Conclusion
Why change the Language in Microsoft Word?
Changing the language in Microsoft Word offers significant advantages. It enables you to compose content accurately in different languages, ensuring effective communication. Collaborating with multilingual teams becomes smoother, as everyone can understand and contribute meaningfully.
Adapting to specific language conventions showcases cultural sensitivity. Moreover, Word's user interface can be customized, optimizing your experience. In essence, altering the language setting in Microsoft Word facilitates better cross-lingual communication, boosts collaboration, and refines your writing for various purposes.
Elevate your skills with comprehensive Microsoft Office training today. Join now!
Changing the display language
Changing the display language in Microsoft Word refers to modifying the language used for menus, buttons, and commands. This is especially useful when you're more comfortable or proficient in a language other than the default. Here's how to do it:
For Word 2016 and 2019
a) Open Word: Launch the Microsoft Word application on your computer.
b) Access options: Click on the "File" tab in the window's upper left corner.
c) Choose options: From the dropdown menu, select "Options" at the bottom. This opens the Word Options dialog box.
d) Navigate to language settings: Within the Word Options dialog box, find and click on the "Language" tab.
e) Select editing languages: You'll see a list of languages in the "Choose Editing Languages" section. Click the "Add additional editing languages" dropdown to add your desired language.
f) Adjust language preferences: Choose your preferred language from the list and move it to the top of the language list using the up arrow button.
g) Apply and restart: After arranging the languages, click "OK" to apply the changes. You'll be prompted to restart Word for the new display language to take effect. Save any open documents before continuing.
For Microsoft 365

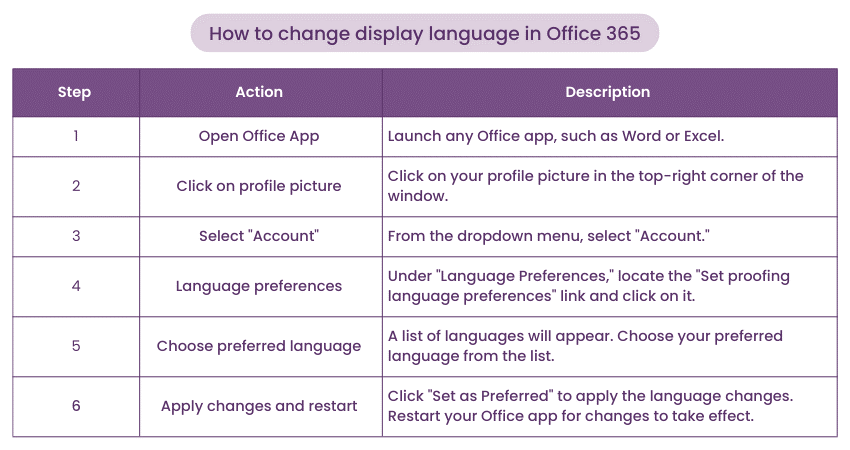
a) Open an Office app: Launch any Microsoft 365 app, such as Word.
b) Access account settings: Click on your profile picture in the window's top-right corner.
c) Go to account: From the dropdown menu, select "Account."
d) Language preferences: Under "Language Preferences," you can "Set your proofing language preferences." Click on this.
e) Select preferred language: Choose your desired language from the list and click "Set as Preferred."
f) Restart for changes: To apply the changes, restart your Office applications. You should sign out and sign in again for the changes to take full effect.
Unlock Your Data Potential: Join our Microsoft Access Masterclass and become a data management expert today!
Proofing language settings
Setting the proof language in Microsoft Word is a vital aspect of ensuring accurate spelling and grammar checks for your documents. It involves specifying the language you want Word to use when reviewing and suggesting corrections. Here's a comprehensive guide on how to set proofing languages
Setting proofing Language for the entire document
a) Open document: Open the document you want to work on in Microsoft Word.
b) Review tab: Navigate to the "Review" tab located in the top menu.
c) Language options: Click on the "Language" button, usually situated on the left side of the ribbon.
d) Set proofing language: A dropdown menu will appear. Select "Set Proofing Language."
e) Choose language: In the Proofing Language dialogue box, choose your preferred language from the list.
f) Set as default: To apply this language to the entire document, click the "Default" button.
g) Confirm and close: Click "OK" to confirm your selection and close the dialogue box.
Setting proofing Language for specific text
a) Select text: Highlight the specific text for which you want to change the proofing language.
b) Right-Click or review Tab: Right-click on the selected text and choose "Language," or navigate to the "Review" tab and click on "Language."
c) Choose proofing language: Similar to the previous method, select your desired proofing language from the list.
Unlock your potential with our Microsoft Office 365 Masterclass. Elevate your skills today!
User interface language
The user interface language in Microsoft Word refers to the language in which the menus, commands, and options are displayed. This means that when you change the user interface language, you're customizing how Word looks and interacts with you. Here's a detailed guide on how to change the user interface language:
a) Open Word: Launch Microsoft Word on your computer.
b) Navigate to options: Navigate to the "File" tab located in the upper left corner, followed by choosing "Options" situated at the bottom. This action will open up the Word Options dialog box.
c) Access language settings: In the Word Options dialogue, choose the "Language" tab from the list on the left.
d) elect display language: Under "Choose Display and Help Languages," you'll see a dropdown list with available languages. Choose the language you want the interface to be displayed in.
e) Change Office display language: If you're using Office 365, you can also click the "Set Office Language Preferences" link to change the language for all Office apps, including Word.
f) Apply and restart: After selecting the desired language, click "OK." You'll be prompted to restart Word for the changes to take effect.
Unlock Your Potential with Our Microsoft Teams Masterclass – Join Now!

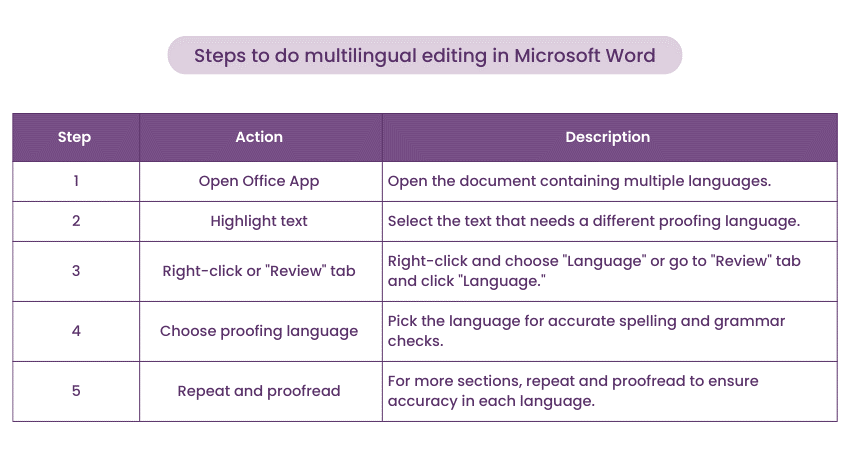
Multilingual editing in Microsoft Word refers to the process of working with documents that contain content in multiple languages. It involves adjusting the proofing language settings for specific portions of text to ensure accurate spell-checking and grammar correction. This capability is particularly valuable when you're dealing with documents that include quotes, phrases, or entire sections in languages other than the document's primary language. Here's how you can effectively perform multilingual editing:
a) Open Document: Begin by opening the document in Microsoft Word that contains content in different languages.
b) Select Text: Highlight the specific text that you want to assign a different proofing language to. This could be a sentence, a paragraph, or an entire section.
c) Proofing Language: Right-click on the selected text and choose "Language" from the context menu. Alternatively, you can navigate to the "Review" tab and click on the "Language" button.
d) Choose Language: From the dropdown menu, select the appropriate proofing language for the highlighted text. This ensures that the spell check and grammar correction tools consider the chosen language's rules.
e) Repeat as Needed: If your document contains multiple sections in different languages, repeat the process for each relevant section. Assign the correct proofing language to each portion to ensure accurate corrections.

Conclusion
Now you know How to Change Language in Microsoft Word, which offers you a magic tool to enhance your writing and communication. Whether you're typing, checking, or customizing Word, these steps cover it all. By understanding how to make Word understand you in any language, you're unlocking a world of possibilities. So, follow these instructions on "How to Change Language in Microsoft Word" and embark on a journey of seamless and effective language utilization. Happy writing!
Unlock your full potential with our Microsoft Word Masterclass and become a word-processing wizard today!
Frequently Asked Questions
Upcoming Office Applications Resources Batches & Dates
Date
 Microsoft Word Course
Tue 18th Jun 2024
Tue 20th Aug 2024
Tue 22nd Oct 2024
Tue 17th Dec 2024


 Top Rated Course


 If you wish to make any changes to your course, please


