We may not have the course you’re looking for. If you enquire or give us a call on 01344203999 and speak to our training experts, we may still be able to help with your training requirements.
Training Outcomes Within Your Budget!
We ensure quality, budget-alignment, and timely delivery by our expert instructors.

In today's digital age, Screen Recording on Android devices has advanced from a simple utility to a powerful tool for communication, education, and entertainment. Whether you're curious to demonstrate a complex process, share highlights of a live game moments, or resolve technical issues, knowing how to effectively Screen Record on your Android device is invaluable. In this comprehensive blog, we'll dive into the step-by-step process of How to Screen Record on Android? Explore alternative methods and provide additional tips to help you master this essential skill.
Table of Contents
1) Steps to Screen Record on Android
a) Access your Android Quick Settings
b) Select the Screen Record option
c) Capture audio along with your recording
d) Personalise sound preferences
e) Initiate the recording by tapping Start
f) Conclude by swiping down and selecting Stop
g) Review your recorded content
h) Customise your video as needed
i) Preserve a duplicate copy
2) Alternative methods for Screen Recording on Android
3) Adding text titles to Screen Recordings
4.) Conclusion
Steps to Screen Record on Android
Screen Recording on Android devices has become more accessible with recent updates. Here are the general steps to Screen Record on Android below:
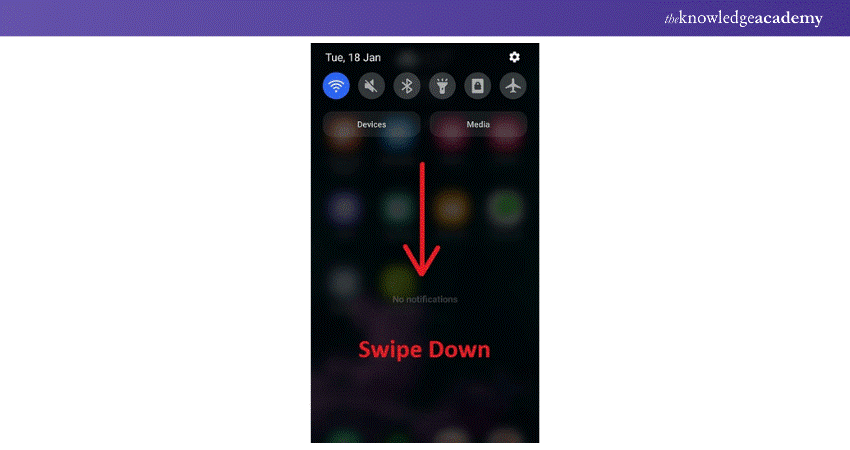
Access quick settings

1) Swipe down from the top of your screen to open Quick Settings
2) This can be done by dragging your finger downwards from the top edge of the screen
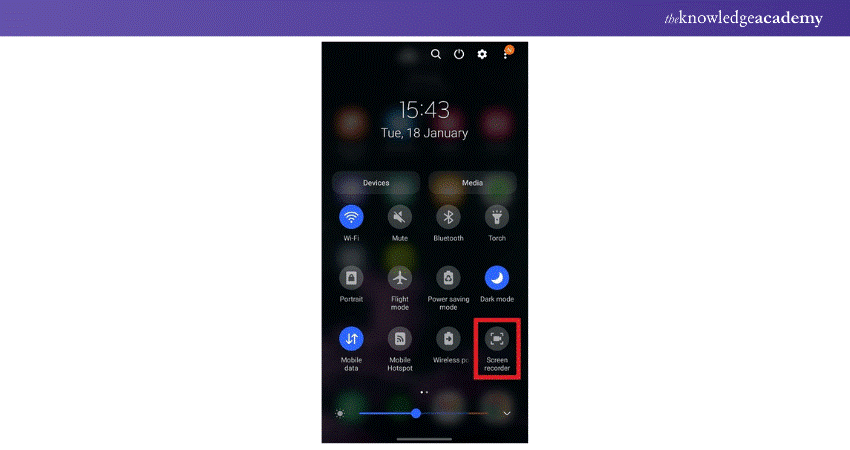
Select Screen Record Option

1) Locate and tap the Screen Record icon among the Quick Settings toggles
2) You may need to swipe left or right to find it
3) The Screen Record icon usually resembles a camera or camcorder
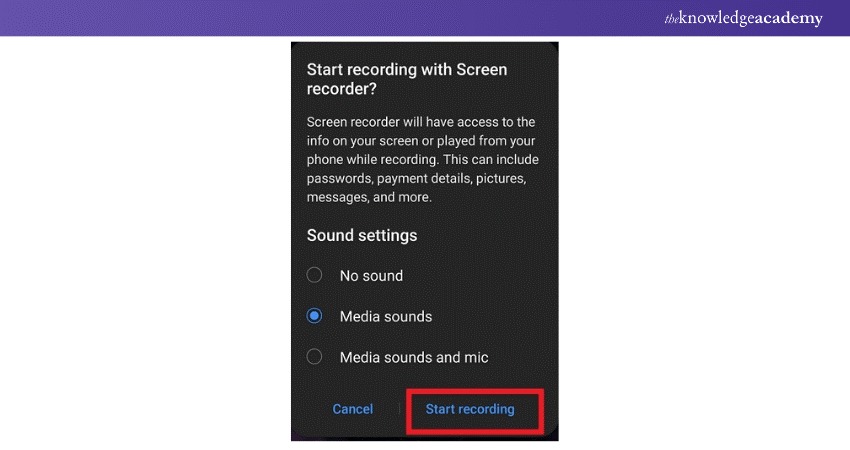
Capture audio along with your recording
1) Decide if you want to record internal audio, microphone input, or both
2) This choice depends on what you want to include in your recording
Mobile App mastery starts here with our Mobile App Development Training.
Personalise sound preferences
1) Adjust audio settings such as system sounds, microphone input, and external audio sources
2) Configure these settings based on your recording requirements
Initiate the recording by tapping Start

1) Tap the Start button to begin the Screen Recording process
2) Some devices may display a countdown timer before recording starts
Conclude by swiping down and selecting Stop
1) Swipe down from the top of the screen to access the notification panel
2) Tap the Screen Recording notification
3) Select Stop to end the recording
Dive into iOS App excellence now with our iOS App Development Training.
Review your recorded content
1) Open your device's gallery or file manager to view the recorded video.
2) Ensure the visuals are clear and the audio quality meets your expectations.
Customise your video as needed
1) Use video editing software or apps to trim, annotate, or add text overlays.
2) Enhance the video with filters or effects if desired.
Preserve a duplicate copy
1) Save a duplicate of the recorded video to prevent accidental loss or corruption.
2) Choose a secure location such as internal storage, external storage, or cloud storage.
Alternative Methods for Screen Recording on Android
In addition to using the built-in screen recording feature available on some Android devices, you can also use additional methods for screen recording:
Utilise Google Play Games
1) Install Google Play Games: Download and install the Google Play Games app from the Google Play Store.
2) Open Google Play Games: Launch the Google Play Games app on your device.
3) Navigate to Your Game: Find and select the game you want to record within the app.
4) Initiate Screen Recording: Look for the Screen Recording option within the game's details page.
5) Start Recording: Tap the Screen Recording option to begin recording your gameplay.
6) Customise Recording Settings (Optional): Adjust settings like video resolution and audio preferences according to your needs.
7) Pause and Resume Recording (Optional): Utilise the pause and resume feature during gameplay as needed.
8) Finish Recording and Save: Tap the Stop button to end the recording session and save the video.
9) Review and Share Recording: Access the recorded video through the Google Play Games app or your device's gallery. Share the video with friends or upload it to social media platforms directly from the app.
Employ AZ Screen Recorder
a) Install AZ Screen Recorder:
1) Download and install AZ Screen Recorder from the Google Play Store.
2) Ensure your device meets the necessary requirements for installation.
b) Launch AZ Screen Recorder:
1) Open the AZ Screen Recorder app after installation.
2) Familiarise yourself with the app's interface and features.
c) Adjust Recording Settings:
1) Access the settings menu within AZ Screen Recorder to customise recording parameters.
2) Modify options such as video resolution, frame rate, bitrate, and audio settings according to your preferences.
d) Select Recording Area:
1) Choose the specific area of your screen to capture.
2) Options include full-Screen Recording or selecting a custom area by adjusting the recording frame.
e) Enable Audio Recording (Optional):
1) Decide whether to capture audio alongside the Screen Recording.
2) Toggle audio recording settings to include system sounds, microphone input, or both.
f) Start Screen Recording:
1) Initiate the Screen Recording process by tapping the Record button within AZ Screen Recorder.
2) Begin capturing your device's screen activity, including any selected audio inputs.
g) Pause and Resume Recording (Optional):
1) Utilise the pause and resume feature during recording to capture specific moments or take breaks.
2) This allows for greater flexibility in the recording process.
h) Manage Recording Controls:
1) Use the recording controls provided by AZ Screen Recorder to pause, resume, or stop the recording as needed.
2) These controls ensure smooth operation and precise capture of content.
I) Access additional Features (Optional):
1) Explore additional features offered by AZ Screen Recorder, such as video editing capabilities, live streaming options, or screen drawing tools.
2) Enhance your recordings with creative elements or annotations.
j) Finish Recording and Save:
1) Conclude the recording session by tapping the Stop button within AZ Screen Recorder.
2) The recorded video will be automatically saved to your device's storage.
k) Review and Share Recording:
1) Locate the recorded video in your device's gallery or file manager.
2) Review the footage to ensure it meets your expectations in terms of quality and content.
3) Share the video with friends or upload it to social media platforms directly from AZ Screen Recorder.
Opt for ADV Screen Recorder
a) Install ADV Screen Recorder:
1) Download and install ADV Screen Recorder from the Google Play Store.
2) Ensure you have sufficient storage space on your device for the installation.
b) Launch ADV Screen Recorder:
1) Open the ADV Screen Recorder app after installation.
2) Familiarise yourself with the app's interface and features.
c) Configure Recording Settings:
1) Access the settings menu to customise recording parameters.
2) Adjust options such as video resolution, frame rate, and audio settings according to your preferences.
d) Select Recording Source:
1) Choose the desired recording source, such as screen capture, camera input, or both.
2) This allows you to record various types of content, including gameplay, tutorials, or vlogs.
e) Enable Audio Recording (Optional):
1) Decide whether to capture audio along with the Screen Recording.
2) Toggle audio recording settings to include system sounds, microphone input, or both.
f) Start Screen Recording:
1) Initiate the Screen Recording process by tapping the Record button.
2) Begin capturing your device's screen activity, along with any selected audio inputs.
g) Manage Recording Controls:
1) Utilise the recording controls to pause, resume, or stop the recording as needed.
2) This allows you to capture content with precision and control.
h) Access Additional Tools (Optional):
1) Explore additional features offered by ADV Screen Recorder, such as video editing capabilities or screen drawing tools.
2) Enhance your recordings with creative elements or annotations.
i) Finish Recording and Save:
1) Conclude the recording session by tapping the Stop button.
2) The recorded video will be automatically saved to your device's storage.
j) Review and Share Recording:
1) Locate the recorded video in your device's gallery or file manager.
2) Review the footage to ensure it meets your expectations in terms of quality and content.
3) Share the video with friends or upload it to social media platforms as desired.
Adding Text Titles to Screen Recordings
After recording your screen, you can enhance your videos by adding text titles using video editing apps like Adobe Premiere Rush, Kinemaster, or InShot. Simply import your recorded video into the editing app, add text overlays with desired fonts, colors, and animations, and save the edited video.
Conclusion
Screen Recording on Android devices offers a convenient way to capture and share moments, tutorials, and troubleshooting steps. By following the step-by-step guide outlined above, along with exploring alternative methods and additional tips, you can master the art of How to Screen Record on Android? and unleash your creativity in sharing visual content. Whether you're a content creator, educator, or tech enthusiast, Screen Recording is a versatile tool that opens endless possibilities for communication and expression.
Unlock your Android App potential today with our Android App Development Training.
Frequently Asked Questions

Keyboard shortcuts, Built-in tools and Third-party software.

The fastest way to take a screenshot typically involves using keyboard shortcuts. On most systems, pressing "PrtScn" or "Command + Shift + 3/4" allows for quick capture without the need to open additional applications or tools.

The Knowledge Academy takes global learning to new heights, offering over 30,000 online courses across 490+ locations in 220 countries. This expansive reach ensures accessibility and convenience for learners worldwide.
Alongside our diverse Online Course Catalogue, encompassing 17 major categories, we go the extra mile by providing a plethora of free educational Online Resources like News updates, Blogs, videos, webinars, and interview questions. Tailoring learning experiences further, professionals can maximise value with customisable Course Bundles of TKA.

The Knowledge Academy’s Knowledge Pass, a prepaid voucher, adds another layer of flexibility, allowing course bookings over a 12-month period. Join us on a journey where education knows no bounds.

The Knowledge Academy offers various App & Web Development Training, including Website Design Course, MongoDB Developer Course and XML Fundamentals Course. These courses cater to different skill levels, providing comprehensive insights into What is Lua Programming?
Our Programming & DevOps covers a range of topics offering valuable resources, best practices, and industry insights. Whether you are a beginner or looking to advance your skills, The Knowledge Academy's diverse courses and informative blogs have you covered.
Upcoming Programming & DevOps Resources Batches & Dates
Date
 Mobile App Development Course
Fri 26th Jul 2024
Fri 25th Oct 2024


 Top Rated Course


 If you wish to make any changes to your course, please


