




We may not have the course you’re looking for. If you enquire or give us a call on 01344203999 and speak to our training experts, we may still be able to help with your training requirements.
How to Create a New Layout in AutoCAD: Step-by-step Guide
ByVishnu SankarLast updated on: 02 October 2026
Learn how to create a new layout in AutoCAD, configure the page setup, add a title block, create a viewport, set its scale and prepare your drawing for plotting.
AutoCAD is a powerful Computer-Aided Design (CAD) application used to create precise 2D and 3D drawings. Its layouts provide a paper space environment where drawings can be organised for plotting or presentation. Learning how to create a new layout in AutoCAD helps you prepare model space drawings as structured drawing sheets.
According to Polaris Market Research, the computer-aided design market is projected to grow at a CAGR of 5.70% between 2022-2030. This blog will guide you through a step-by-step process on how to create a new layout in AutoCAD, ensuring you can harness this versatile software's full potential.
What is a Layout in AutoCAD?
An AutoCAD layout is a virtual sheet where you can organise and present your drawings, serving as a container for both graphical and non-graphical elements of your design. While settings like changing Units in AutoCAD are typically handled at the drawing level, layouts offer control over scale, viewport arrangement, plot styles, and other sheet-specific settings, simplifying the management of multiple drawings within a project. Structured layouts can help organise drawing sheets consistently and present model views clearly for plotting or review.
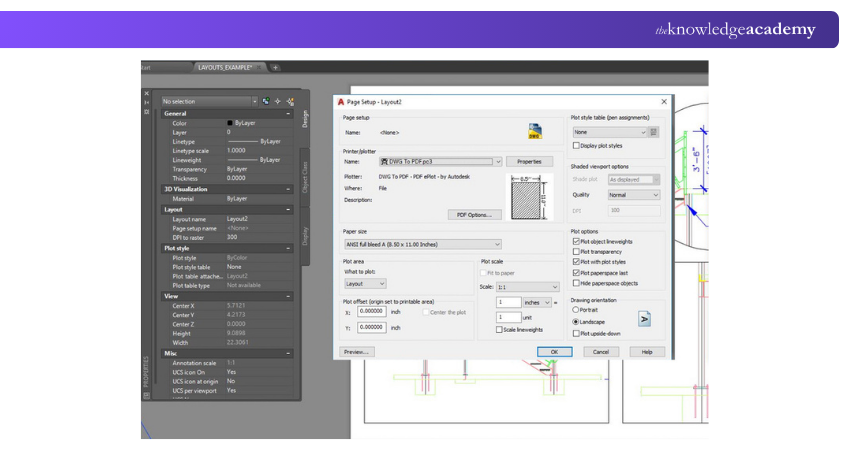
When creating a layout in AutoCAD, you can customise its paper size, orientation, and title block to fit your output format, such as A4 or ANSI D. You can also add graphical elements like dimensions, text annotations, and labels to improve the clarity and readability of your design.

How to Create a New Layout in AutoCAD?
Now that you understand what layouts are in AutoCAD, let's explore how to create a new layout in AutoCAD:
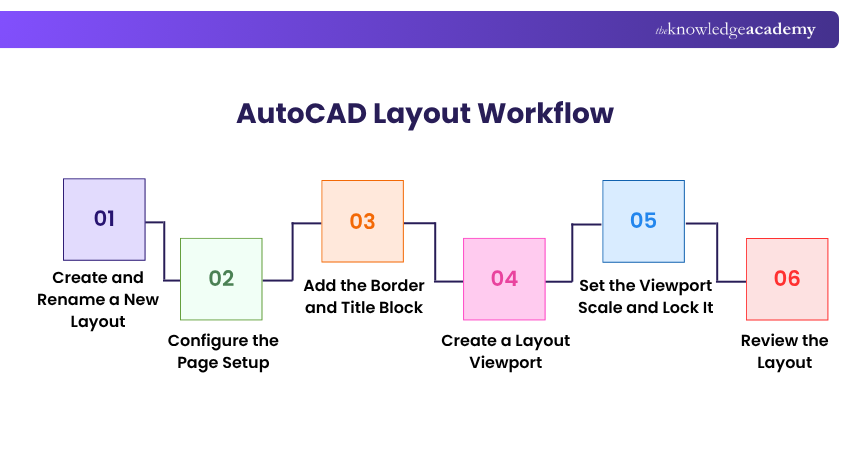
Step 1: Create and Rename a New Layout
Open AutoCAD and either start a new drawing or open an existing one that you want to prepare for presentation or plotting. At the bottom of the drawing window, locate the model and layout tabs. Click the plus (+) sign next to the existing layout tabs to create a new layout.
Once the layout is created, rename it according to its purpose, such as Floor Plan, Ground Floor or Sheet 1. Using meaningful names makes layouts easier to identify and organise, especially when a drawing contains multiple sheets or views.
Step 2: Configure the Page Setup
Next, configure how the layout relates to the intended sheet and output device. Right-click the layout tab and choose Page Setup Manager. Make sure the current layout is selected and click Modify to open its page setup settings.
Configure the settings required for your drawing, including:
a) Printer/Plotter: Select the appropriate output device or PDF plotter.
b) Paper Size: Choose the sheet size required for the drawing.
c) Drawing Orientation: Select Portrait or Landscape as appropriate.
d) Plot Style Table: Select the required plot style where applicable.
e) Plot Area: Select Layout.
f) Plot Scale: When Layout is selected as the plot area, the layout is plotted at 1:1, while the required drawing scale is normally controlled through the layout viewport.
Click OK to save the settings and Close to exit Page Setup Manager. The paper size should also correspond with the title block or sheet border you intend to use. Autodesk specifically highlights matching the page setup paper size to the title block size.
Pro Tip
Configure the paper size and orientation before positioning your title block and viewport. This gives you the correct sheet area to work with and can reduce the need to reposition elements later.
Step 3: Add the Border and Title Block
Once the page setup is configured, add the required border and title block to the layout. A title block typically contains drawing information such as the project name, drawing title or number, author or drafter details, revision information and date. You can insert an existing title block or use one provided through your organisation.
Position the border and title block correctly in paper space so they align with the selected sheet size. Then, add or update the required project and sheet information before arranging the model views within the layout.
Create cleaner drawings and build stronger drafting skills with the AutoCAD LT Training – Sign up now!
Step 4: Create a Layout Viewport
Next, create a layout viewport to display your model space drawing within the layout. A viewport is an object in paper space that acts as a window into model space. You can create multiple viewports on the same layout when you need to show different views or drawing scales.
Use AutoCAD's layout viewport tools to create the required viewport and adjust its size and position on the sheet. Once created, you can move or resize it using its boundary and grips. Then, activate the viewport to adjust the model view within the available area before setting the required viewport scale.
Trainer's Insight
Treat a viewport as a window into model space rather than part of the drawing itself. You can move or resize the viewport in Paper Space without changing the actual geometry in Model Space.
Step 5: Set the Viewport Scale and Lock It
Select the viewport boundary and set the required viewport scale based on your drawing and project requirements. Remember that viewport scale is different from layout plot scale. The paper space layout is commonly plotted at 1:1, while the viewport determines the scale at which the full-size model space drawing appears on the sheet.
Once the required scale is set, position the model correctly within the viewport and lock the viewport. Using the display locked property prevents accidental panning or zooming from changing the configured view and scale.
Common Mistake
Resizing a viewport boundary and changing its scale are not the same thing. Resizing changes the amount of space the viewport occupies on the sheet, while the viewport scale controls how the Model Space drawing is displayed within it.
Step 6: Review the Layout
Before plotting or presenting the drawing, review the completed layout to ensure everything is correctly configured. Check the paper size, title block, viewport position, viewport scale, viewport lock and plot settings. You can also add any required sheet-specific notes, labels or other information in paper space to improve drawing clarity.
Keep in mind that annotations do not always need to be created in paper space, as AutoCAD also supports annotation workflows in model space. Finally, use plot preview to check how the completed sheet will appear and identify any issues before producing the final output.
Learn how to turn your ideas into precise digital designs by joining the AutoCAD Course today!
Quick Check: Is Your AutoCAD Layout Ready?
Before finishing, check:
□ Is the correct paper size and orientation selected?□ Is the title block positioned correctly?□ Is the required part of the model visible?□ Is the viewport scale correct?□ Is the viewport locked?□ Does the plot preview show the expected output?

Vishnu Sankar is a Senior Content Writer with 5+ years of experience across content development, software development, web development and system administration. His technical background and professional training support his expertise in IT and Tech, while his extensive research and writing experience covers Project Management and Health and Safety.
View Detail

 If you wish to make any changes to your course, please


