




We may not have the course you’re looking for. If you enquire or give us a call on 01344203999 and speak to our training experts, we may still be able to help with your training requirements.
How to Insert a Checkbox in Excel
ByNilotpal SarmahLast updated on: 10 October 2026
Learn how to insert a checkbox in Excel using the Insert menu or Form Controls, link checkboxes to cells, add multiple checkboxes, and use them with formulas.

What You'll Learn
1. Insert a checkbox in a cell in Excel using Insert > Checkbox.2. Add Form Control checkboxes through the Developer tab when required.3. Link Form Control checkboxes to cells to return TRUE or FALSE.4. Add and duplicate multiple checkboxes for lists and task tracking.5. Use checkbox values with formulas such as the FILTER function.
Looking for a simple way to make your spreadsheets more interactive and manage tasks effortlessly? Discover how to insert a Checkbox in Excel and transform your workflow! By adding Checkboxes, you can easily track task completion, organise your data visually, and streamline your processes.
With checkboxes in Excel, marking tasks as complete or tracking progress becomes easier. Dive into this guide to learn how to insert a checkbox in Excel for various tasks. Using checkboxes can help organise your data more effectively and improve your workflow.
How to Add a Checkbox in Excel?
Excel for Microsoft 365 supports in-cell checkboxes through Insert > Checkbox. Desktop versions of Excel also support Form Control checkboxes through the Developer tab, which must be enabled if it is not already visible.
Insert an In-Cell Checkbox in Excel
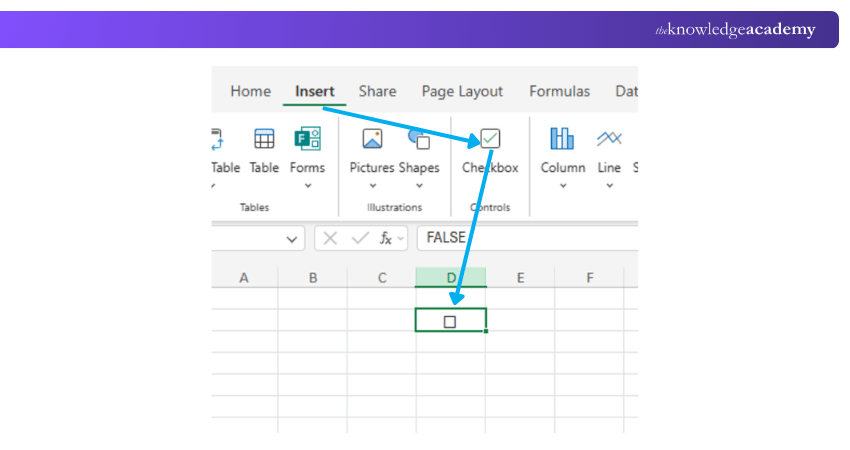
Microsoft 365 allows you to insert checkboxes directly into cells. Select the cell or range where you want the checkboxes, then go to Insert > Checkbox. A checked checkbox has the value TRUE, while an unchecked checkbox has the value FALSE.
Quick Check
Which checkbox method suits your task? Use in cell checkboxes for simple TRUE or FALSE tracking, and Form Control checkboxes when you need linked cells or additional control settings.
Enable the Developer Tab
The following steps apply to Excel on Windows. On Mac, open Excel > Preferences and enable the Developer tab from the Ribbon settings. Use the steps below to turn on the Developer tab:
1) Click on the "File" tab in the Excel ribbon.
2) Choose "Options."
3) In the Excel Options window, choose "Customise Ribbon."
4) In the right-hand column, check the "Developer" option.
5) Click "OK."

Insert a Form Control Checkbox
After enabling the Developer tab, you can insert a Form Control checkbox:
1) Go to the worksheet where you want to insert the checkbox.
2) Select the Developer tab.
3) In the Controls group, select Insert.
4) Under Form Controls, select Check Box.
Draw the Checkbox
After selecting the Checkbox option, your cursor will change to a crosshair. Click and drag on the worksheet in order to draw the Checkbox. This is where the Checkbox will be placed.
Customise Checkbox Properties (Optional)
You can customise the properties of the Checkbox to suit your needs. Right-click on the Checkbox, and you'll have various options, including:
1) Changing the text associated with the Checkbox.
2) Linking the Checkbox to a cell. This cell will display a "TRUE" or "FALSE" value when the Checkbox is checked or unchecked.
3) Adjusting the size and appearance of the Checkbox.
Position and Format the Checkbox
After inserting the Checkbox, you can move and resize it as needed. Click and drag the Checkbox to reposition it, and use the resizing handles to adjust its size.
Test the Checkbox
Click the checkbox to test it. It should toggle between checked and unchecked states. If the Form Control checkbox is linked to a cell, the linked cell displays TRUE when checked and FALSE when unchecked.
That's it! You've successfully added a checkbox to your Excel sheet. You can repeat these steps to insert more checkboxes in Excel as needed. Checkboxes are particularly useful for creating interactive to-do lists, data entry forms, and various other tasks where you need user input or make selections within your Excel spreadsheet.
Transform data into insights with Business Analytics With Excel Course - Join today!
How to Link a Form Control Checkbox to a Cell?
To return the checked or unchecked state of a Form Control checkbox in a worksheet cell, follow these steps:
1) Right click the checkbox and select Format Control.
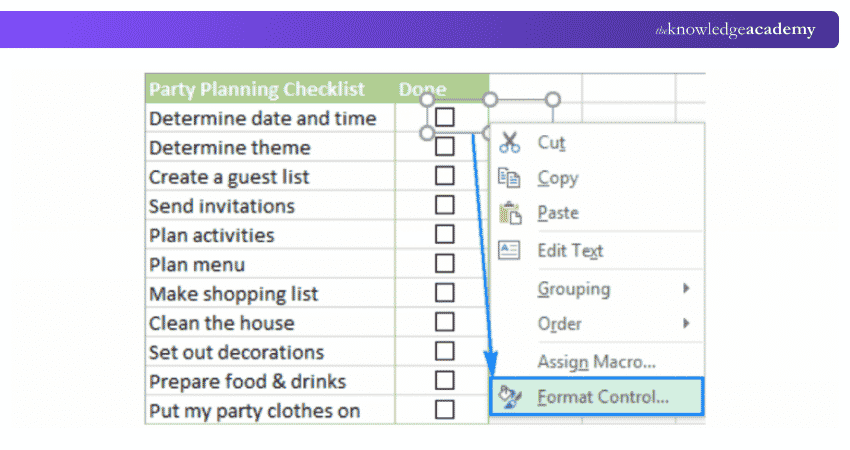
2) In the Format Control dialog box, select the Control tab.
Click the Cell link box, then select an empty cell on the worksheet or enter the cell reference manually.
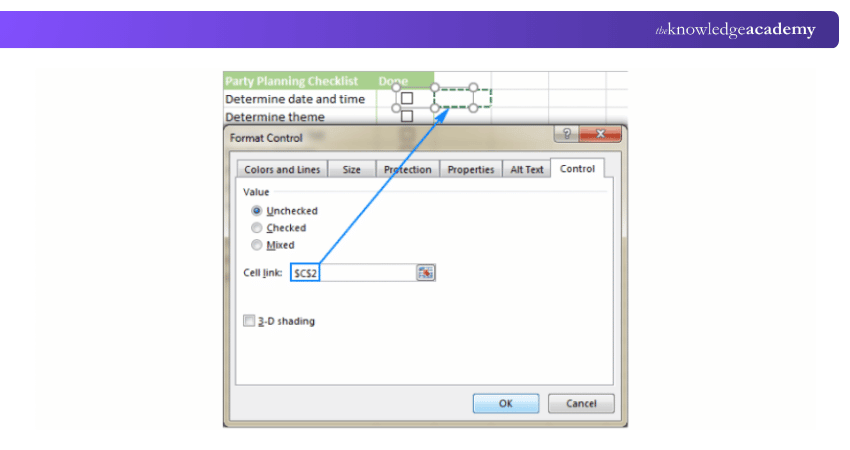
3) In Cell link, select an empty worksheet cell or enter its reference manually.
4) Click OK to apply the link.
5) Repeat for Other Checkboxes
Tip: Select linked cells in an adjacent column without other data. This way, you can hide them later to avoid clutter.
When you select or clear each linked checkbox, the linked cells display TRUE for checked and FALSE for unchecked.
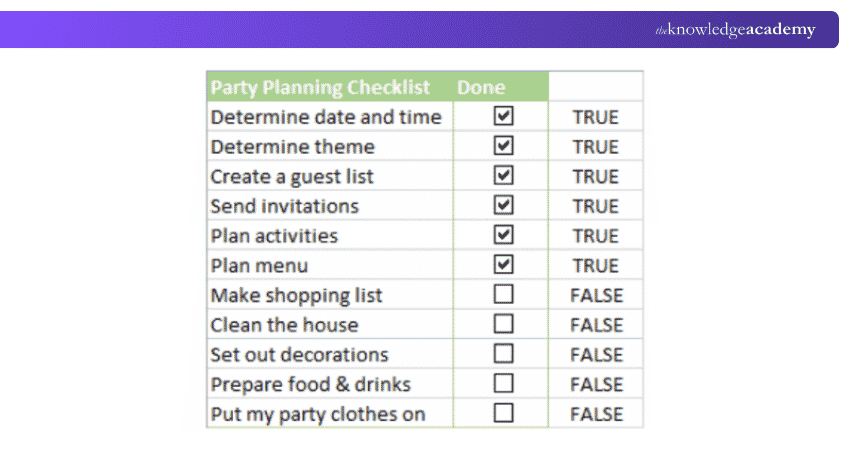
These linked cells might not seem useful at first, but they open up many new possibilities for your worksheet!
Strengthen financial analysis skills with our Excel for Accounting Course - Sign up today!
Incorporating Multiple Checkboxes in Excel
Incorporating multiple Checkboxes in Excel can be done in several ways. Here are three methods for adding multiple Checkboxes:
Insert Multiple In-Cell Checkboxes
Select the range of cells where you want checkboxes, then go to Insert > Checkbox. Excel adds a checkbox to each selected cell, making this the quickest method for creating checklists in supported Microsoft 365 versions.
Adding Form Control Checkboxes via the Developer Tab
To add a single checkbox, follow the steps in the previous section. To add multiple checkboxes, repeat the process and place each checkbox in the desired location. Here's a summary:
1) Activate the Developer tab.
2) Select Insert, then choose Check Box under Form Controls.
3) Draw the checkbox in the desired location
4) Customise the Checkbox properties as needed.
5) Repeat steps 2-4 to add more Checkboxes.
Duplicating and Pasting the Checkbox
If you have one Checkbox that is configured the way you want, you can duplicate and paste it into other cells. Follow these steps:
1) Select the Form Control checkbox you want to duplicate.
2) Copy it using Ctrl + C or Copy.
3) Paste the duplicate using Ctrl + V or Paste.
4) Drag the copied control to the required position.
5) If the checkbox uses a cell link, check Format Control > Control > Cell link and update the linked cell where necessary.
The duplicate checkbox will be placed in the selected cell. You can continue copying and pasting the checkbox into as many cells as needed.
Using these methods, you can efficiently incorporate multiple Checkboxes into your Excel spreadsheet. You can create to-do lists, data entry forms, surveys, or any other interactive elements within your workbook.
Automate spreadsheet tasks with Microsoft Excel VBA And Macro Training – Join today!
Combining Checkboxes with Formulas
Checkbox cells and linked Form Control cells can return TRUE or FALSE, allowing these logical values to be used in Excel formulas.
Creating a Filtered List
To create a list of objectives that are yet to be completed, use Excel’s FILTER function. This function will filter the list of objectives (cells B5 through B13) based on the FALSE state of the neighbouring cells (C5 through C13).
Enter this formula in-cell G5:
=FILTER(B5:B13,C5:C13=FALSE,"")
Trainer's Pro Tip
Keep checkbox values in a clear helper range when building formulas. This makes logical tests easier to manage and helps keep task trackers and filtered lists organised.
Creating a “Note”
Change the Font: To give the list of incomplete tasks a handwritten appearance, change the font to one that resembles handwriting.
a) Add a Shape: Add a “Rectangle: Folded Corner” shape from the “Basic Shapes” group and place it in front of the filtered list.
b) Set Transparency: Adjust the fill colour's transparency to between 80% and 90% to make it almost transparent.
Advantages:
The note shape makes the underlying cells harder to select, which can reduce accidental changes.
Ensure the note shape is tall enough to accommodate all objectives when no Checkboxes are selected, as the shape does not resize dynamically based on Checkbox selections.
Excel now offers an easy in-cell checkbox option in Microsoft 365, while Form Control checkboxes remain useful for traditional control settings and linked cells. Choosing the right method can make task lists, trackers, and formula driven worksheets easier to manage.
Build project scheduling skills with Excel Training With Gantt Charts today!

Nilotpal Sarmah is a Senior Content Writer with 11+ years of overall experience spanning engineering, operations and content development. His technical knowledge and extensive writing experience enable him to simplify specialised topics across IT and Tech, Business Skills, Project Management, Health and Safety, and ISO and Compliance.
View Detail

 If you wish to make any changes to your course, please


