




We may not have the course you’re looking for. If you enquire or give us a call on 01344203999 and speak to our training experts, we may still be able to help with your training requirements.
Understanding the Delegation Event Model in Java: An Overview
ByNilotpal SarmahLast updated on: 10 October 2026
Explore the intricacies of the delegation event model in Java. This blog delves into the concept of events in Java and how the delegation event model functions. Gain insights into implementing the delegation event model in Java and learn how to build a straightforward GUI application using this approach.
Overview
1. The Delegation Event Model in Java manages how events generated by GUI components are passed to registered listeners for processing.2. Key elements include event sources, event objects, and listeners that work together to handle user interactions.3. Java uses listener interfaces such as ActionListener and MouseListener to respond to different types of events.4. The model supports loose coupling, code reusability, and more maintainable event-driven applications.5. GUI applications can use the delegation event model to handle actions such as button clicks and calculator operations.
The delegation event model in Java is an essential concept for building event-driven applications and managing interactions between GUI components and event-handling logic. Understanding this model is vital for developers to create responsive and interactive applications.
Java remains widely used for building a range of applications, including event-driven and GUI-based software. Java’s support for building interactive applications contributes to its continued use across different development scenarios. In this comprehensive blog, we will explain the delegation event model in Java, exploring its details, how it works, and different implementations in programming and development.
What are Events in Java?
Events in Java represent actions or changes, such as user interactions or system notifications, that can trigger specific responses within an application. This event-driven approach allows developers to create applications that respond appropriately to user inputs and system events.
At the core of Java's event system lie two critical components: event sources and event listeners. The event sources, such as buttons or menus, serve as the origins of events. Event sources generate events, while event listeners wait for and respond to those events when they occur. When an event occurs, the registered listeners process it and execute the appropriate response.

How Does the Delegation Event Model Work?
The delegation event model separates event generation from event handling. When an event occurs, the event source passes it to the appropriate registered listener, which processes the event and performs the required action.
The delegation event model involves three key components: the event source, event object, and event listener. The event object contains essential details about the event, such as its type and source. The source refers to the GUI component responsible for generating the event, while the listener waits to process and respond to it.
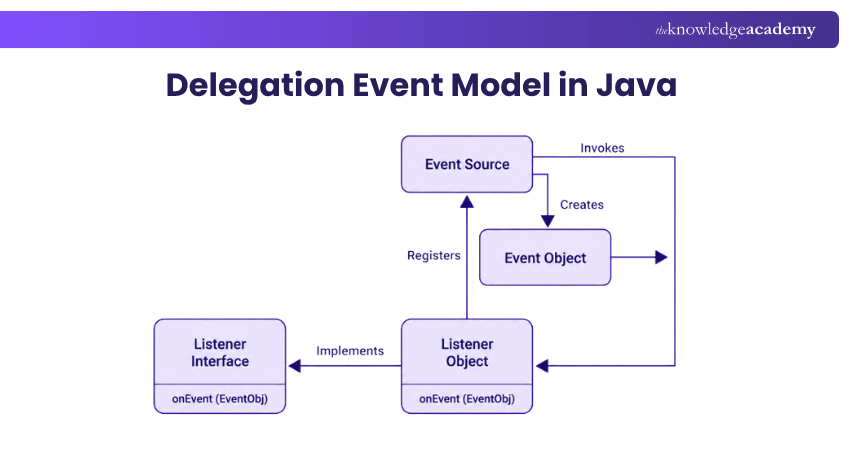
Another important aspect of the delegation event model is event dispatching. When an event occurs, the source creates an event object and notifies the registered listener. The listener then processes the event and performs the required action. Multiple listeners can be registered with an event source, allowing them to respond when the relevant event occurs.
Implementing the Delegation Event Model in Java
The delegation event model offers loose coupling and code reusability, promoting maintainable applications. It also supports flexibility and extensibility, allowing developers to add new events more easily. The delegation event model can be implemented through the following key steps:
Creating Custom Events
When an application requires custom events, developers can create event classes that extend the java.util.EventObject class. These custom event classes store event-specific information that can be passed from event sources to listeners. For example, in a GUI application, developers can create a ‘CustomButtonClickEvent’ class to encapsulate data related to button click events, such as the button's label, position, or any additional context-specific information.
Implementing Event Listeners
Next, developers need to implement event listener interfaces that are appropriate for the types of events the application needs to handle. In Java, listener interfaces include ‘java.awt.event.ActionListener’ and ‘java.awt.event.MouseListener’, among others.
Each listener interface defines one or more methods that can be implemented to respond to the corresponding events. For instance, to handle button click events, developers can create an ‘ActionButtonClickListener’ class that implements the ‘ActionListener’ interface and provides the necessary logic for processing button clicks.
Registering and Handling Events
Once the required event classes and listener implementations are in place, developers can proceed with registration and event handling. To register event listeners with their respective event sources, developers use methods like ‘addActionListener’ or ‘addMouseListener’. In our example, the ‘ActionButtonClickListener’ can be registered with a button using the addActionListener(actionButtonClickListener) method.
When an event such as a button click occurs, the event source generates an event object containing relevant details. The event is then passed to the registered listener, which processes it through the appropriate callback method.
Sample Program for the Delegation Event Model in Java
Here is a sample Java program demonstrating the delegation event model:
import java.awt.*;import java.awt.event.*;public class DelegationEventModelDemo {public static void main(String[] args) {// Check whether a graphical environment is availableif (GraphicsEnvironment.isHeadless()) {runHeadlessExample();return;}Frame frame = new Frame("Delegation Event Model Demo");frame.setLayout(new FlowLayout());Button button = new Button("Click Me!");frame.add(button);// Register the listener with the buttonbutton.addActionListener(new ActionListener() {@Overridepublic void actionPerformed(ActionEvent e) {System.out.println("Button Clicked!");}});frame.setSize(300, 200);frame.setVisible(true);// Close the window properlyframe.addWindowListener(new WindowAdapter() {@Overridepublic void windowClosing(WindowEvent e) {frame.dispose();}});}private static void runHeadlessExample() {ActionListener listener = new ActionListener() {@Overridepublic void actionPerformed(ActionEvent e) {System.out.println("Button Clicked!");}};// Simulate an event in a headless environmentActionEvent event = new ActionEvent(new Object(),ActionEvent.ACTION_PERFORMED,"Click Me!");listener.actionPerformed(event);System.out.println("GUI cannot be displayed because this environment is headless.");}}
Output in a Headless Environment:
Button Clicked!GUI cannot be displayed because this environment is headless.
If you run the program locally in a desktop environment, no additional display configuration is usually required. In some Unix or Linux environments, particularly when running graphical applications remotely, you may need to configure the DISPLAY environment variable so the application knows where to render its interface.
Trainer’s Pro Tip
Keep event-handling logic separate from GUI components wherever possible. Register only the listeners you need and use clear callback methods to make Java applications easier to maintain and troubleshoot.
Build your Java programming skills and strengthen your understanding of event-driven applications with our Java Programming Course - Join today!
Building a Simple GUI Application
Let’s look at a practical example by creating a basic calculator application with arithmetic operations. We'll follow three key steps: designing the GUI, implementing event listeners, and handling events.
Designing the GUI
First, design the GUI with buttons for numbers and arithmetic operations. For instance, create buttons for digits 0 to 9 and buttons for addition, subtraction, multiplication, and division. Arrange them in a clear and organised layout to support ease of use.
Implementing Event Listeners
Implement event listeners to respond to button clicks. Create an event listener class that implements the ‘ActionListener’ interface, which includes the ‘actionPerformed’ method. In this method, identify the button that was clicked using the event object and perform the corresponding arithmetic operation. For example, when the addition button is clicked, the application processes the entered values and performs the addition operation.
Event Handling in the Application
When the user interacts with a calculator button, the registered CalculatorListener receives the resulting ActionEvent. The actionPerformed method identifies the selected command and calls the appropriate logic to process numbers, operators, or the result.
Sample Program
Once all the steps are followed, the resulting program should look something like this:
import java.awt.*;import java.awt.event.*;import javax.swing.*;public class BasicCalculator {private static JTextField display;private static double firstNumber = 0;private static String operator = "";private static boolean startNewNumber = true;public static void main(String[] args) {try {if (GraphicsEnvironment.isHeadless()) {runHeadlessDemo();return;}SwingUtilities.invokeAndWait(BasicCalculator::createGUI);} catch (Exception | AWTError e) {runHeadlessDemo();}}private static void createGUI() {JFrame frame = new JFrame("Basic Calculator");frame.setDefaultCloseOperation(JFrame.EXIT_ON_CLOSE);frame.setLayout(new BorderLayout());display = new JTextField("0");display.setEditable(false);display.setHorizontalAlignment(JTextField.RIGHT);frame.add(display, BorderLayout.NORTH);JPanel buttonPanel =new JPanel(new GridLayout(4, 4, 5, 5));String[] buttonLabels = {"7", "8", "9", "+","4", "5", "6", "-","1", "2", "3", "*","0", ".", "=", "/"};ActionListener listener = new CalculatorListener();for (String label : buttonLabels) {JButton button = new JButton(label);button.addActionListener(listener);buttonPanel.add(button);}frame.add(buttonPanel, BorderLayout.CENTER);frame.setSize(300, 300);frame.setLocationRelativeTo(null);frame.setVisible(true);}private static class CalculatorListenerimplements ActionListener {@Overridepublic void actionPerformed(ActionEvent e) {String command = e.getActionCommand();if (Character.isDigit(command.charAt(0))|| command.equals(".")) {handleNumber(command);} else if (command.equals("=")) {handleEquals();} else {handleOperator(command);}}}private static void handleNumber(String command) {if (command.equals(".")&& !startNewNumber&& display.getText().contains(".")) {return;}if (startNewNumber) {display.setText(command.equals(".") ? "0." : command);startNewNumber = false;} else {display.setText(display.getText() + command);}}private static void handleOperator(String command) {if (!display.getText().isEmpty()) {firstNumber =Double.parseDouble(display.getText());operator = command;startNewNumber = true;}}private static void handleEquals() {if (operator.isEmpty()|| display.getText().isEmpty()) {return;}double secondNumber =Double.parseDouble(display.getText());try {double result =calculate(firstNumber,secondNumber,operator);display.setText(formatResult(result));} catch (ArithmeticException ex) {display.setText("Error");JOptionPane.showMessageDialog(null,ex.getMessage());}operator = "";startNewNumber = true;}private static double calculate(double firstNumber,double secondNumber,String operator) {switch (operator) {case "+":return firstNumber + secondNumber;case "-":return firstNumber - secondNumber;case "*":return firstNumber * secondNumber;case "/":if (secondNumber == 0) {throw new ArithmeticException("Cannot divide by zero.");}return firstNumber / secondNumber;default:throw new IllegalArgumentException("Unknown operator: " + operator);}}private static String formatResult(double value) {if (value == Math.rint(value)) {return String.valueOf((long) value);}return String.valueOf(value);}private static void runHeadlessDemo() {System.out.println("GUI cannot be displayed because "+ "this environment is headless.");System.out.println("Sample calculation: 12 + 8 = "+ formatResult(calculate(12, 8, "+")));}}
Output in a Headless Environment:
GUI cannot be displayed because this environment is headless.Sample calculation: 12 + 8 = 20
Learn the important concept of GUI programming with our Java Swing Development Training - Join now!

Nilotpal Sarmah is a Senior Content Writer with 11+ years of overall experience spanning engineering, operations and content development. His technical knowledge and extensive writing experience enable him to simplify specialised topics across IT and Tech, Business Skills, Project Management, Health and Safety, and ISO and Compliance.
View Detail

 If you wish to make any changes to your course, please


