


 Top Rated Course


We may not have the course you’re looking for. If you enquire or give us a call on 01344 203999 and speak to our training experts, we may still be able to help with your training requirements.
Xero Tips and Tricks for Better Accounting Efficiency
Olivia Taylor 27 April 2026Improve workflow with Xero Tips and Tricks, including keyboard shortcuts, bank rules, cash coding, repeating invoices, and find and recode for faster accounting. These features help reduce manual work and minimise errors. Streamline daily tasks, save valuable time, and manage your finances with greater accuracy and confidence.

Training Outcomes Within Your Budget!
We ensure quality, budget-alignment, and timely delivery by our expert instructors.
Table of Contents

Managing accounts efficiently is essential for any growing business. The right tools and smart techniques can make everyday bookkeeping faster and far less stressful. Small changes in how you use your software can lead to big time savings.
In this blog, we’ll explore practical Xero Tips and Tricks to help you automate tasks and stay organised. From shortcuts to smarter invoicing, these strategies are designed to boost productivity. Let’s dive into the features that can transform your workflow.
Table of Contents
1) Xero Tips and Tricks Overview
a) Create Customised Roles
b) Use Repeat Bills to Automate Regular Supplier Payments
c) Keyboard Shortcuts and Hotkeys
d) Effortless Invoice Reminder Setup
e) Sync With Google Sheets
2) Tracking Transactions with Xero Tracking Categories
3) Can Xero Calculate Taxes?
4) Does Xero Calculate VAT?
5) Conclusion
Xero Tips and Tricks Overview
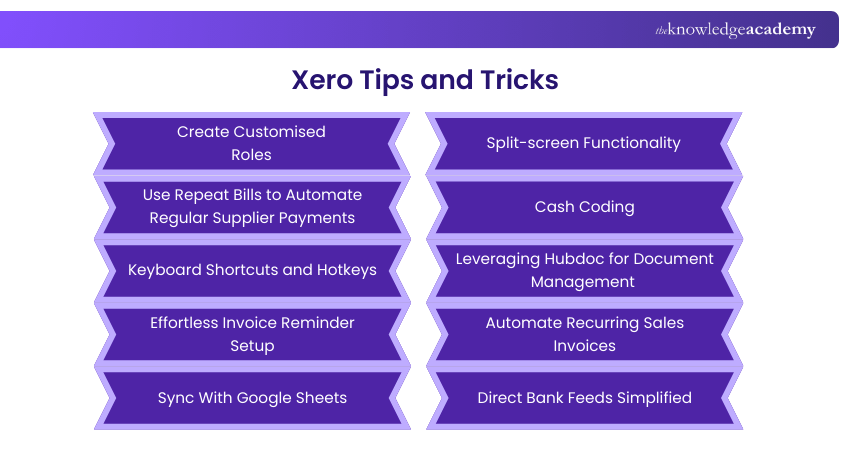
The Xero Tips and Tricks overview highlights smart ways to simplify accounting tasks, from automating invoicing to using shortcuts and custom reports. With this, you can streamline reconciliations, manage bank feeds, and boost productivity for efficient Financial Management. Let's check the most common Xero Tips and Tricks in detail:
1) Create Customised Roles
One of the best Features of Xero is that you can create customised roles for different users in your organisation. It allows you to control the access and permissions of each user, depending on their role and responsibility. For example, you can create a role for your Accountant, Bookkeeper, Manager, Salesperson, etc., and assign different access levels to your Xero data.
To create a customised role, go to Settings > Users and click on Add a user. Then, choose Custom as the role and name it as you wish. Next, you can select the features and functions you want to grant or restrict for this role. You can also set the approval limits and lock dates for this role. Finally, click Save and invite the user to join your Xero organisation.
2) Use Repeat Bills to Automate Regular Supplier Payments
You can save time by setting up repeat bills in Xero for recurring expenses like rent, utilities, or subscriptions. This feature automatically generates draft or approved bills at your chosen frequency, reducing manual entry. It ensures consistent record-keeping and improves cash flow visibility by forecasting regular outgoings with minimal effort.
3) Keyboard Shortcuts and Hotkeys
Xero’s keyboard shortcuts and hotkeys help you navigate the platform faster with minimal clicking. By pressing the forward slash ( / ) and a letter, you can quickly jump to key areas like invoices, contacts, and reports. Learning these shortcuts saves time and streamlines everyday accounting tasks.
4) Effortless Invoice Reminder Setup
Xero allows you to set up automatic invoice reminders, so clients get notified when a payment is due or overdue. You can customise the timing and message for each reminder, helping reduce late payments without manual follow-ups. This feature streamlines accounts receivable and keeps cash flow healthier with less effort.Enhance your skills to confidently manage invoicing, expenses, and reporting with our Wave Accounting Training – Register today!
5) Sync With Google Sheets
Google Sheets is a powerful tool for creating and editing spreadsheets online. You can use Google Sheets to analyse, visualise, and share your Xero data with others. For example, you can create charts, graphs, pivot tables, formulas, and more with your Xero data in Google Sheets.
To sync your Xero data with Google Sheets, use a third-party app, such as (G-Accon for Xero). This app lets you connect your Xero account with your Google account and access your Xero data in Google Sheets. You can also schedule automatic updates and refresh and upload your Xero data in Google Sheets.
To use G-Accon for Xero, you must install the app and authorise it to access your Xero and Google accounts. Then, you can open a new or existing spreadsheet in Google Sheets and click on the G-Accon for Xero menu. From there, you can choose the Xero data that you want to sync, such as:
a) Accounts
b) Bank transactions
c) Contacts
d) Invoices
e) Bills
f) Payments
g) Reports
6) Split-screen Functionality
You can use the split-screen functionality if you want to work on multiple tasks or view different information in Xero simultaneously. This functionality allows you to split your screen into two or more parts and open different Xero tabs or windows in each part. Multitasking and comparing data can help you improve your productivity and efficiency.
To use the split-screen functionality, you must use a keyboard shortcut or a mouse gesture, depending on your device and browser. For example, for Windows and Chrome, you can use the following steps:
a) Open your Xero account in your browser and go to the tab or window you want to split.
b) Press and hold the Windows key and press the left or right arrow key to move the tab or window to the left or right half of the screen.
c) Release the Windows key and press the up or down arrow key to adjust the size of the tab or window.
d) Repeat the same steps for another tab or window you want to split and move it to the opposite half of the screen.
e) You can also drag and drop the tabs or windows to the edges or corners of the screen to split them.
7) Cash Coding
Cash coding is a feature in Xero that allows you to reconcile large numbers of bank transactions quickly and easily. Cash coding is especially useful for transactions that are simple, repetitive, or have a consistent pattern.
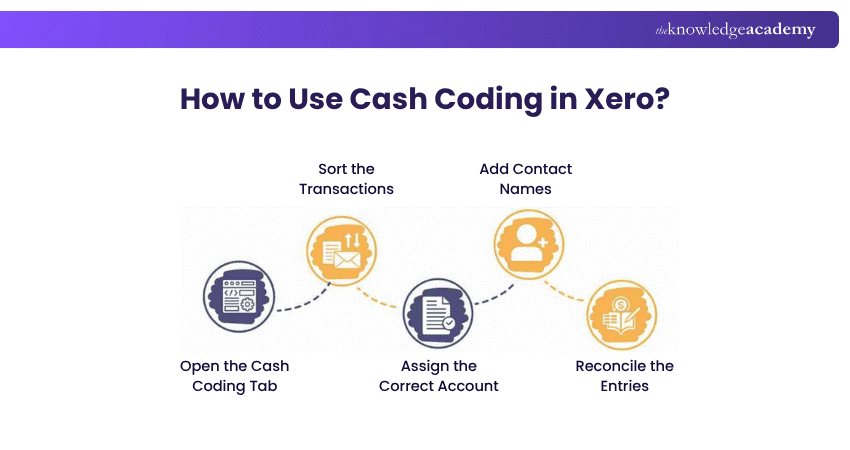
Cash coding in Xero lets you quickly reconcile bulk transactions like cash sales, bank fees, or interest income. Go to Accounting > Bank Accounts > Cash Coding to get started. Select transactions, apply accounts, tax rates, and categories, then click Reconcile. Use filters to sort and group, and edit or undo if needed.
Here's how you can set up invoice reminders in Xero:
1) Objective: Set up automated invoice reminders in Xero.
2) Access Point: Go to Settings > General Settings > Invoice Settings in Xero.
3) Configuration: Click on Invoice Reminders and enable the feature.
4) Customisation: Define settings such as:
a) Number of days before/after due date for reminders.
b) Email subject and message for reminders.
c) Sender and recipient email addresses.
d) Option to exclude specific customers or invoices.
5) Save and Activate: Click Save to apply settings and activate invoice reminders.
8) Leveraging Hubdoc for Document Management
Hubdoc is a cloud-based Document Management app that integrates with Xero. Hubdoc allows you to capture, store, and organise your receipts, bills, invoices, and other documents in one place. You can also sync your documents with Xero and create transactions automatically.
To use Hubdoc with Xero, you need to connect your Hubdoc account with your Xero account. You can do this by logging in to your Hubdoc account and clicking Accounts > Destinations > Xero. Then, you can choose the Xero organisation you want to connect with and authorise the connection.
Once you have connected Hubdoc with Xero, you can upload your documents to Hubdoc using various methods, such as:
a) Scanning with your mobile device
b) Forwarding by email
c) Uploading from your computer
d) Fetching from online sources
Learn how to streamline bookkeeping and manage expenses with our QuickBooks Training – Join now!
9) Automate Recurring Sales Invoices
If you have customers, you invoice regularly for the same amount or service, you can automate the process by creating recurring sales invoices in Xero. Recurring sales invoices are automatically generated and sent to customers at a specified frequency and interval. It can save you time and hassle and ensure you get paid on time.
To create a recurring sales invoice, go to Business> Invoices and click on the Repeating tab. Then, click on new Repeating Invoice and fill in the details, such as:
a) The customer's name and email address.
b) The invoice date and due date.
c) The frequency and interval of the invoice.
d) The start date and end date of the invoice.
e) The invoice number and reference.
f) The invoice line items and amounts.
g) The invoice branding and layout.
h) The invoice options, such as sending online, attaching PDF, or approving automatically.
10) Direct Bank Feeds Simplified
Direct bank feeds are a feature that allows you to automatically import your bank transactions into Xero from your bank account. It can help you save time and avoid manual data entry errors. You can also reconcile your bank transactions in Xero and keep your accounts up to date.
To set up direct bank feeds, you need to check if your bank supports this feature and if you meet the eligibility criteria. You can find the list of supported banks and the eligibility criteria. Then, you need to complete and submit a bank feed application form to your bank. You can find the form or your Xero account settings.
Once you have submitted the form, your bank will process your application and activate the direct bank feed for your account. It may take a few days or weeks, depending on your bank. You will receive a notification from Xero when your direct bank feed is ready. Then, you can start importing your bank transactions into Xero and reconcile them.
11) Efficiently Find and Recode Transactions
You can use the Find and Recode feature to edit or update multiple transactions in Xero. This feature allows you to search for transactions that match certain criteria and apply changes to them in bulk. For example, you can use Find and Recode to:
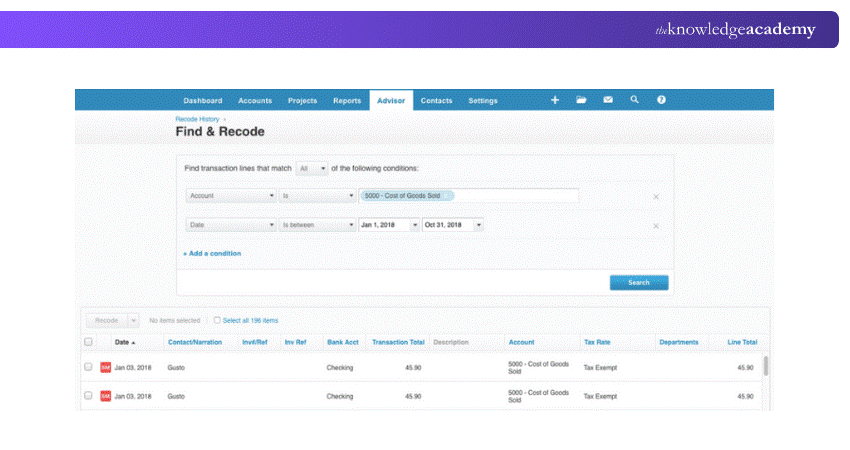
a) Change the account, tax rate, or tracking category of transactions
b) Add or remove attachments to transactions
c) Merge or split transactions
d) Delete or void transactions
Manage inventory, GST, payroll, and financial reports with our Tally Training – Sign up now!
12) Seek Expert Advice for Advanced Assistance
If you need expert advice or assistance for your Xero account, you can seek help from Xero-certified advisors. Xero-certified advisors are professionals who have completed Xero training and certification and can offer you various services, such as:
a) Setting up and managing your Xero account
b) Providing accounting, bookkeeping, tax, or payroll services
c) Advising you on best practices and tips for using Xero
d) Helping you with troubleshooting and resolving issues in Xero
13) Secure Your Data With Lock Dates
Lock dates are a feature that allows you to prevent changes to your Xero data after a certain date. It can help you protect your data from accidental or unauthorised edits, deletions, or additions. Lock dates are especially useful for:
a) Finalising your financial reports and statements
b) Complying with tax or audit requirements
c) Maintaining data integrity and consistency
Here are the steps for securing your data with lock dates in Xero:
1) Objective: Secure your Xero data using lock dates.
2) Access Point: Go to Settings > General Settings > Financial Settings in Xero.
3) Lock Dates: Click on Lock Dates.
4) Configuration: Choose the date from which you want to lock your data. Options may include:
a) Locking all transactions
b) Locking only reconciled transactions
5) Save Settings: Click Save to apply lock date settings and secure your data.
14) Built in Calculators
Xero has built-in calculators that allow you to perform simple or complex calculations within the fields of your transactions, reports, budgets, and more. The calculators can enter or edit amounts, percentages, dates, and formulas. It can help you save time and avoid errors when working with numbers in Xero.
To use the calculators, click on the field you want to calculate and enter the calculation using the keyboard or the mouse. You can use the following symbols and operators for your calculations for:
a) Addition
b) Subtraction
c) Multiplication
d) Division
e) Percentage
f) Brackets
g) Equals
You can also use the following functions for your calculations:
a) SUM for summing up a range of values
b) AVERAGE for calculating the average of a range of values
c) MIN for finding the minimum value in a range of values
d) MAX for finding the maximum value in a range of values
e) COUNT for counting the number of values in a range of values
You can use a colon (:) to separate the start and end of a range of values. For example, you can use SUM(A1:A10) to calculate the sum of the values from A1 to A10.
After you have entered the calculation, press Enter or Tab to display the result in the field. You can also press Esc to cancel the calculation and revert to the original value.
15) Effortless Emailing of Bill PDFs to Xero
If you receive bills from your suppliers by email, you can easily import them into Xero by forwarding them to your inbox. Xero will automatically extract the details and create a draft bill in your account. You can also attach the bill PDF to the draft bill as proof of purchase.
To use this feature, you must find your Xero email address. You can do this by going to Business> Bills to pay and clicking on the Email tab. Then, you will see your Xero inbox email address, which is unique to your Xero organisation. You can copy the email address and save it in your contacts.
Tracking Transactions with Xero Tracking Categories
If you want to track the performance of different aspects of your Business, such as projects, departments, locations, or products, you can use the tracking feature in Xero. Tracking allows you to assign tracking categories and options to your transactions, such as invoices, bills, payments, etc. You can then use the tracking categories and options to filter and analyse your reports, budgets, and more.
You need to set up tracking categories and options in your Xero account settings to use tracking. Go to Settings > General Settings > Tracking and click Add Tracking Category. Then, you can name the tracking category and add the tracking options you want. For example, you can create a tracking category called Project and add tracking options such as Project A, Project B, Project C, etc.
After you have set up tracking categories and options, you can assign them to your transactions in Xero. You can do this by selecting the tracking category and option from the drop-down menus in the transaction fields. If needed, You can assign multiple tracking categories and options to a transaction.
Can Xero Calculate Taxes?
Yes, Xero can calculate various taxes on your transactions, including sales and purchase taxes. You can set default tax rates for accounts, contacts, and inventory items to streamline data entry. Xero applies the correct tax based on your region's rules and lets you generate tax reports for compliance, filings, and financial analysis.
Does Xero Calculate VAT?
Xero is designed to handle Value Added Tax (VAT) calculations efficiently with His Majesty's Revenue and Customs (HMRC). It applies VAT rates to invoices, bills, and expenses based on your country’s tax settings. You can customise VAT rates, track VAT on purchases and sales, and generate detailed VAT returns. This helps ensure accurate reporting and simplifies your VAT submission to tax authorities.
Conclusion
Using the right features can significantly improve the way you handle daily accounting tasks. With practical Xero tips and tricks, you can save time, reduce errors, and work more efficiently. Start applying these strategies today to create a smoother, more organised workflow.
Take control of your Accounting and Financial Management with ease! Explore our Accounting Software Training today!
Frequently Asked Questions
Is Payroll Easy on Xero?

Yes, Xero makes payroll easy with automated calculations, employee self-service, and direct filing to tax authorities. It simplifies payslips, leave tracking, and compliance, making Payroll Management efficient for small to medium-sized businesses.
What is the Fastest Way to Reconcile in Xero?
The fastest way to reconcile in Xero is by using the cash coding feature. It allows you to bulk match and categorise transactions quickly, apply accounts and tax rates, and reconcile multiple lines at once. It is ideal for high-volume bank feeds.
What are the Other Resources and Offers Provided by The Knowledge Academy?
The Knowledge Academy takes global learning to new heights, offering over 3,000+ online courses across 490+ locations in 190+ countries. This expansive reach ensures accessibility and convenience for learners worldwide.
Alongside our diverse Online Course Catalogue, encompassing 17 major categories, we go the extra mile by providing a plethora of free educational Online Resources like Blogs, eBooks, Interview Questions and Videos. Tailoring learning experiences further, professionals can unlock greater value through a wide range of special discounts, seasonal deals, and Exclusive Offers.
What is The Knowledge Pass, and How Does it Work?
The Knowledge Academy’s Knowledge Pass, a prepaid voucher, adds another layer of flexibility, allowing course bookings over a 12-month period. Join us on a journey where education knows no bounds.
What are the Related Courses and Blogs Provided by The Knowledge Academy?
The Knowledge Academy offers various Accounting Software Courses, including the Sage 50 Accounts Training, QuickBooks Training, and Xero Training. These courses cater to different skill levels, providing comprehensive insights into Accounting Study Tips.
Our Accounting and Finance Blogs cover a range of topics related to Xero Tips and Tricks, offering valuable resources, best practices, and industry insights. Whether you are a beginner or looking to advance your Billing skills, The Knowledge Academy's diverse courses and informative blogs have got you covered.

Olivia Taylor


Chartered Accountant and Financial Training Specialist
Olivia Taylor is a qualified chartered accountant with over a decade of experience in financial management, auditing and corporate reporting. Having worked with leading firms in both the public and private sectors, Olivia brings clarity to complex financial topics. Her writing focuses on helping professionals build confidence in key areas of accounting, compliance and financial planning.
View Detail

 If you wish to make any changes to your course, please


